- Survey Comparison
- Heatmap
- Anonymity Settings
- eNPS in Workforce Analytics Portal
- QxBot Assist in Workforce
- Notes Widget
- Text Analysis Widget
- Response rate
- Text Report
- Trend analysis widget
- Show/hide Markers and Building blocks
- Question Filter
- Single Question Widget
- Heatmap default
- Sentiment analysis
- Scorecard
- Driver analysis
- Scorecard: All options view
- 360 feedback introductory text
- 360 feedback display configurations
- 360 feedback display labels
- Multi Level Priority Logic
- 360 Surveys- Priority Model
- 360 feedback - skip logic
- 360 feedback - show hide question logic
- 360 Survey Settings
- 360 feedback configuration
- Customize the validation text
- 360 Survey design
- 360-Reorder section
- 360 Section Type - Single Select Section
- 360 Delete Sections
- 360 Add Sections
- 360 section type - Free responses text section
- 360 Section Type - Presentations text section
- 360 Section-Edit Configurations
- 360 Survey- Languages
- Matrix section
Workforce 360 Survey- Participant Selection and Controls
How to add participants in 360 surveys?
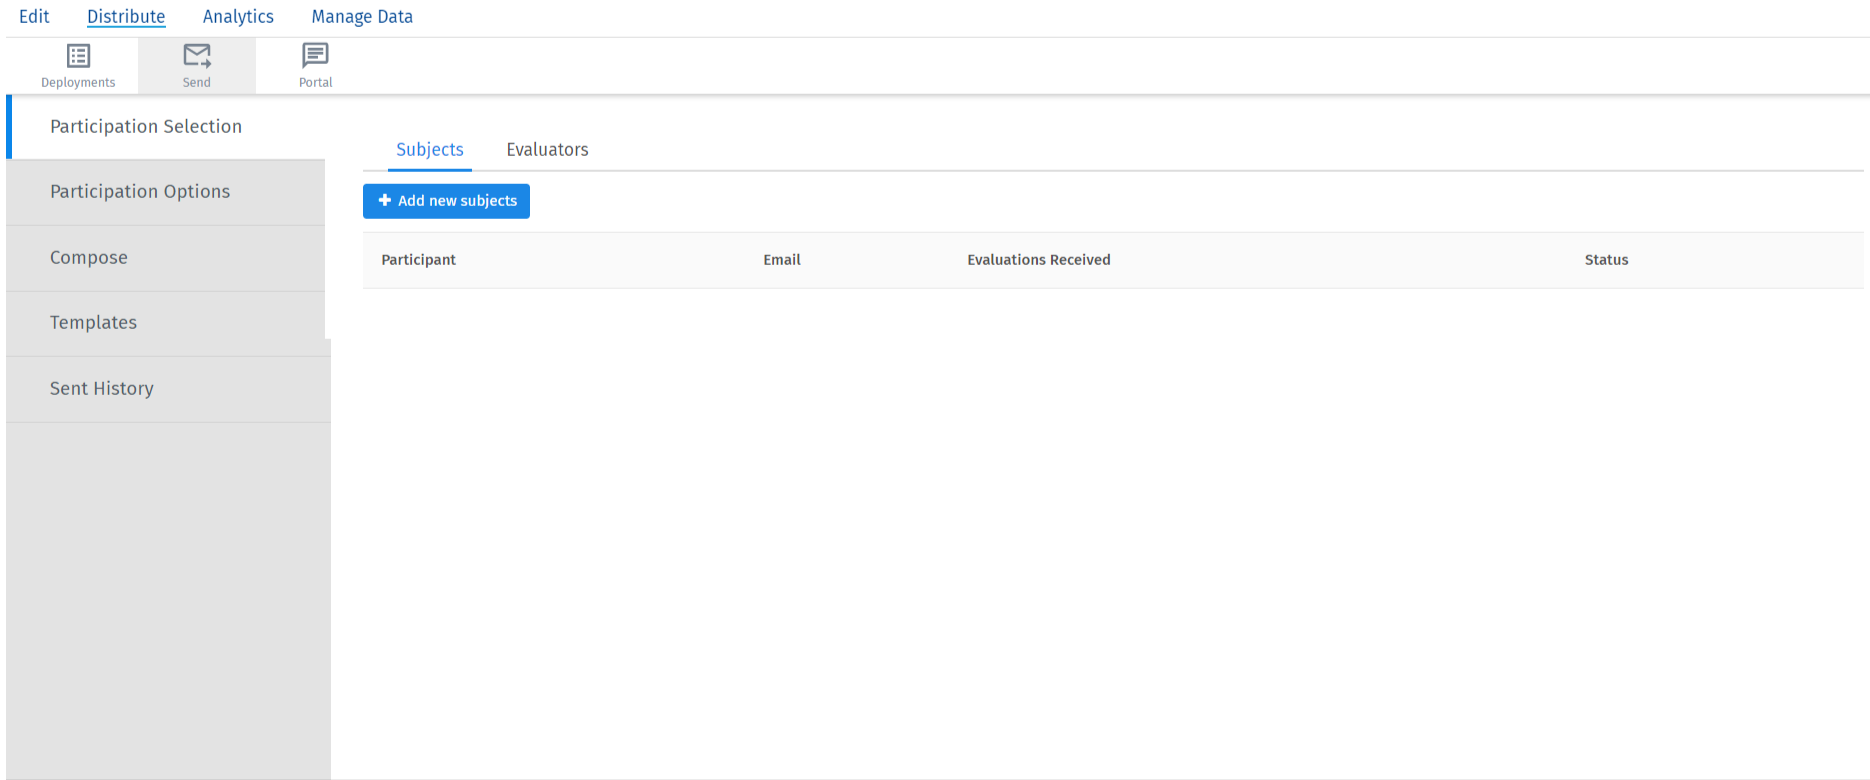
- You can manage the people taking your 360 survey by navigating to the Participants selection section of the Distribution tab. Click on Distribute tab in the dashboard and go to Send option and find the Particpant Options. PARTICIPANT SELECTION
- There are two subsections to the Participants selection section: Subjects and Evaluators. Each subsection only displays participants who belong to the category of the same name. Subjects only displays Subjects and Evaluators displays all participants uploaded to the project. When you search participants on a subsection, you are only searching for ones that fit within that subsection. A participant may show up in multiple subsections. For example, if Jane Doe has a self evaluation to complete, she is both her own subject and her own evaluator, and will appear on both the Subjects and Evaluators subsections.
- Even the tools for each section are the same, with the exception of Reset Participants being on the Subjects subsection
- Login: Log into the subject’s Respondent Portal.
- View Report: View the subject’s report. If you click the email icon in the upper-right, you can email the report to yourself. (The message will be sent to the email address attached to your account.) Click the PDF icon to download it as a PDF.
- View Responses Received: View who individually has evaluated the subject. You will be able to click an evaluator’s name to view the responses they gave. Click the gear to the far-right of an evaluator to Remove or Retake the response.
- Approve Report: This option will not appear unless you have Manager/Administrator approves reports turned on in your Report Options. When these settings are turned on, subjects cannot see their reports until they are approved. Here is where you select to approve a report so it’s released to the subject.
- Remove Report Approval: If you approved a report and need it to be hidden again, click Remove Report Approval.
- Before you conduct a 360, you need to figure out who will be participating. This page will cover the different kinds of participants, their relationships, and how to upload them properly to your 360 project.
- Subjects are the participants being evaluated in your 360. Evaluators are the participants who evaluate a subject. It is possible to be a subject and an evaluator at the same time. For example, I may evaluate you, but then my manager evaluates me, making me a subject and your evaluator. A person who self-evaluates is their own subject and evaluator. It’s also possible to only be a subject or an evaluator. You can easily make a subject an evaluator by assigning that subject as someone’s evaluator.
- Importing Subjects or Evaluators. After you have prepared your subjects file or evaluators file, follow these steps to upload it. Remember to always upload subjects before you upload evaluators. Navigate to the Participants Selection of the Distribute tab. Make sure you are in the correct subsection. Subjects MUST be uploaded under the Subject subsection, and evaluators MUST be uploaded under the Evaluators subsection. Click Add Subjects/Evaluators. Select Import Subjects/Evaluators. If you have participants already saved in your employee roster, you can assign them evaluators based on who’s already listed in their roster relationships. Just select and assign evaluators based on relationships and select the eligible relationship types. Once your fields look correct, click on Add.
- Adding Subjects and Evaluators Manually. When you manually add subjects or evaluators, you must fill out the same columns as the ones in the CSVs described above.
- To add participants manually: Navigate to the Participants selection section of the Distribute tab.Make sure you are in the correct subsection. Subjects MUST be uploaded under the Subject subsection,and evaluators MUST be uploaded under the Evaluators subsection. Click Add Subjects/Evaluators. Select Add Subjects/Evaluators.
- For members that exist in your roster, you can use the search bar at the top. Type in a name and click the user to add them. Each row is a new subject. If you have participants already saved in your roster, you can assign them evaluators based on who’s already listed in their roster relationships. Just select and assign evaluators based on relationships and select the eligible relationship types.When you are all done, click Add.
- ADDING EVALUATORS For members that exist in your roster, you can use the search bar at the top. Search for the Subject and the Evaluator, assign them a relationship, then click Add. Each row is a new subject-evaluator relationship.When you are all done, click Add. PARTICIPANT OPTIONS
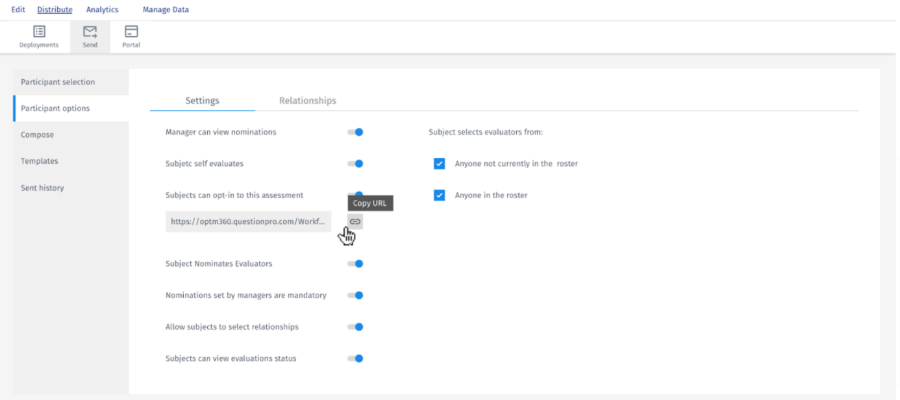
- Manager Can View Nominations: Select this option and managers will be able to view the evaluators nominated by their direct reports.
- Managers Approve Nominations: Don’t allow nominated evaluators to assess subjects until the subject’s manager has approved their nomination.
- Email managers when a subject’s nominations are ready for approval: If there are no requirements on each type of nomination a subject needs to add, managers will be emailed every time someone is nominated. If there are requirements, the system waits until the subject has made all their nominations to alert the manager.
- Allow subjects to email managers when their nominations are ready for approval: This allows the subject to email the manager whenever asking them for approval on their nominations.
- Email subject when a nomination is denied: When this option is selected, subjects will be emailed when their manager has rejected their nomination.
- Manager Approves Evaluations: With this turned on, no evaluations will appear on the subject’s report until it is approved by the manager. 2. SUBJECT OPTIONS
- Subject Self Evaluates: The subject must evaluate themselves.
- Limit self-evaluators by criteria: This option is useful if you need to narrow down who does a self-evaluation. You can narrow this down by metadata.
- Subjects can opt-in to this assessment: This option creates a link where someone can opt-in. So long as they exist in the roster and thus have a portal to log into, this option adds them to the participant list. From there, they can perform any tasks set on the 360 surveys by default (self-assessment, nominating evaluators, etc.).
- Subject Nominates Evaluators: Allows subjects to choose who their evaluators will be.
- Anyone not currently in the assessment: Can only choose people, not in the assessment. Note that this means subjects can type in any email address to invite them to the assessment and that these evaluators will then be added to your roster. There is also the likelihood that duplicates will be added since subjects cannot specify a unique identifier with the evaluator they upload. We generally recommend not using this option if you can instead upload all eligible employees to the roster.
- Anyone in the Assessment: Subjects may nominate anyone uploaded as a participant in the 360 project.
- Only show people who meet certain criteria: Subjects may nominate anyone uploaded as a participant in the 360 project, provided they match certain metadata values.
- Anyone in the Roster: Subjects may nominate anyone saved in the employee roster.
- Only show people who meet certain criteria: Subjects may nominate anyone uploaded to the roster, provided they match certain metadata or email address values.
- Subject cannot remove nominations set by managers or admins: This setting prevents subjects from removing evaluators uploaded for them by an admin or selected by a manager. Subjects can still delete nominations they made themselves.
- Only allow removing nominations from relationships of specific types: When this option is enabled, subjects will only be allowed to remove nominations of selected relationship type.
- Allow subjects to select relationships: This option allows subjects to set the relationships they share with their nominations. If this option is not selected, when the subject nominates an evaluator, the 360 project reads the relationship set between the two in the roster, leaving it blank if there is none. Click Manage Relationships to see the Manage Relationships window and edit your custom relationships.
- Only allow relationships of specified types: When you select this option, you can restrict what relationships a subject can choose from.
- Only allow selecting one type of relationship per evaluator: When this option is not enabled, subjects can nominate the same person multiple times under different relationships. When enabled, this option will prevent subjects from nominating the same person to evaluate them again under a different relationship.
- Subject can view completion status of evaluations: This allows each subject to view whether or not specific evaluations have been completed.
OPTIONS FOR A SINGLE SUBJECT


ADDING SUBJECTS.


SUBJECT SELECTS EVALUATORS FROM -
You may also be interested in...

